Archive | Gifts for Kids RSS feed for this section

Hat and Booties

9 Apr

I finished knitting the hat and booties I had planned to go with the Wrap Sweater I posted about a few weeks ago.  Just in time with less than a week until my due date!

I found both patterns in Natural Nursery Knits by Erika Knight, the same designer of the wrap sweater, and knit them with Baby Ull yarn. Here is the finished result:

DSC00204

And a preview of the complete outfit:

DSC00207

I’m ready whenever you are, baby!

DIY Rosette Headband

2 Apr

Some of the items on my baby prep to-do list includes some cute accessories to have on hand for those early newborn pictures.  I decided I should try my hand at creating a cute little “I’m a girl” headband for her to wear.  While unpacking and putting away some baby gifts this weekend, there were a few things that caught my eye that I figured I could re-purpose into some rosettes for a headband.  I gathered them up along with some other items I had in my stash:  Cute ribbon from sweetly wrapped packages, some left over fabric from projects past, and the fabric pouch that a crib sheet was packaged in.

DSC00163

To make the rosettes, I cut the fabric into about 1 -2 inch wide strips.  Next I cut out a circle from some left over felt to use as a base to the flower. I took my glue gun and added a dab of glue in the middle of the felt circle, and adhered the corner of the fabric to the center.   I let it sit for about a minute for the glue to harden everything into place.

DSC00171

I then twisted the fabric, and started to wind it around the center, using my glue gun to glue the fabric down every inch or two as I wrapped it around and around.

DSC00174

Once complete, I trimmed away the felt base from the edges.

DSC00179

I created several different rosettes using this same method. You can see that the different materials created slightly different looks, and I also played around with how tight or loosely I twisted the fabric or ribbon.

DSC00190

I also hunted through my jewelry box to see if there were any old earrings or accessories that I could use for embellishing a rose or two.  I came across the hair pins that I wore for my wedding, and thought it would be fun to incorporate one of them into one of the flowers.  The gem was attached to the hair pin with some wires, so I simply clipped and unwound the wire to remove the gem, and then glued it into one of the rosettes.

DSC00180

To create the headband, I picked up some elastic at JoAnn Fabric. They were a knit texture with a sort of lace pattern that was softer than the other elastics, so I thought it would be nice and soft for a baby’s head.

DSC00181

I had used a tutorial I found on Pinterest to create the headband at http://thesassypepper.blogspot.ca/2011/02/headband-tutorial-and-bitsy-band.html. It referenced this headband measurement guide:

Newborn (13 1/4″)
3-6 Months (14 1/2″)
6-12 Months (16″)
12 Months-Teen (17 1/2″)
Adult (18″)

So I measured out 13-1/4″ of the elastic for a newborn size band, and glued the ends into place on the back of one of the rosettes.

DSC00183

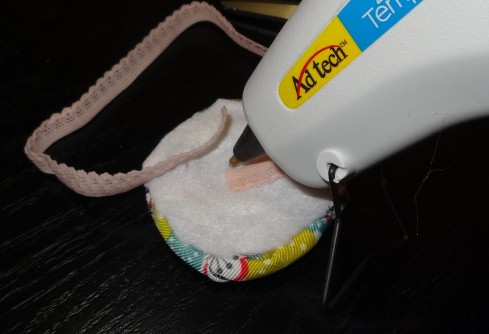
The tutorial recommended a 1/4″ overlap.

DSC00185

Once the band was in place, I cut another circle of felt to glue a final base on the back of the flower.

DSC00186

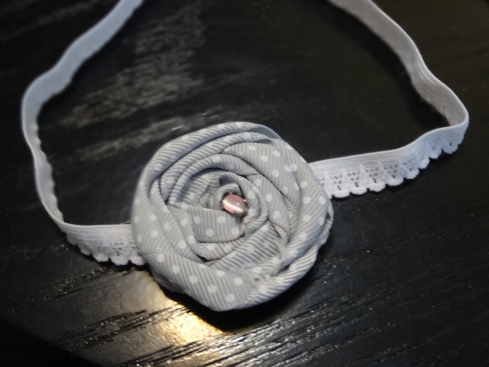
I made three different versions with the rosettes I made:

DSC00196

After I had finished them up, I came across an orphaned earring and did one more add to the grey polka dot headband.  Can’t wait to see how they look on our baby girl’s head!

DSC00198

Lunchbox Dollhouse

10 Jan

This was one of those projects that took weeks to come together, but was fun nearly every step along the way.  As the daughter of a high-school coach, my three year old niece gets brought along to games weekly for which she shows little to no interest at this age.  She plays with her “babies” for hours on end and I thought this might be a simpler way for her to bring babies and play house than dragging a bag full of dolls with her.

I started with a small purple metal lunchbox I found at my favorite Salvation Army store for  just a few dollars.  I went through my stash of scrap-booking paper and found a wood grained piece for the floor and bright colorful stripe for the wallpaper on the walls.  I traced the paper and cut out pieces so that it fit for the floor, and for the walls.  To adhere it to walls I laid a piece of cardboard in the snow, just outside the back door. On these I laid the pieces of paper upside down (one at a time) and gave them a quick spray with 3M Super 77 adhesive. I then quickly brought each piece and the super 77 in and adhered them to the lunchbox. Here in frosty MN when you don’t have a heated garage space, using aerosol adhesives can get tricky. The spray worked better than I expected. You can see the floor and the walls in the photo below.

IMG_1177
Since it was the holidays, I wanted to give the dollhouse some festive decorations.  I found the holiday lights in the scrapbooking section on sale for about $2.00.   I then found an old magnet and applied some of the left over wall paper to the magnet with super 77.  I cut it into small pieces then used a piece of tape to adhere the lights every few inches to the magnets.  They will now stick to the wallpaper and ceiling allowing holiday lights to hang, but also blend in to the paper. I also cut out the shape of Christmas tree on a piece of felt and attached the lights to the front and the magnets to the back with a dab of hot glue.

IMG_1163

Every house needs some family photos framed and hanging on the walls, right?  I took photos of my nieces family, minimized them, put a black frame around them and then printed them in color. For fun I also found an image of a television, Candyland, some books and images of plates of food.  I then used the super 77 to adhere them to an old magnet (reuse!) and cut them out with a scissor.

photos on magnet with edits

I also found a table and bed at the Dollar Tree for $1.00 each along with some small figurines that could call the doll house home.

IMG_1136

I removed the existing bedding on the bed and painted them both with an acrylic paint in a bright pink sure to impress my niece.  I took fabric and made a small pillow, sheet and blanket. In fact the fabric was the extra hem left over from my bridesmaids dress I wore in my niece’s parents’ wedding nearly ten years ago!

IMG_1181

In the photo below you have a clearer view of the floor, and the dollhouse decorated.

IMG_1180

For the finishing touch I used my Cricut and cut out my niece’s name with Vinyl to adhere to the outside.  I also gave her extra magnets if she’d like to decorate the lunch box herself.

IMG_1186

Here is another view of the inside with the books and food and game on the table.

IMG_1179

IMG_1244It was definitely a hit!  I hear she has used it quite a few times already!

I’m linking up to:

Visit thecsiproject.com