Archive | December, 2012

Wine Gift Bag

20 Dec

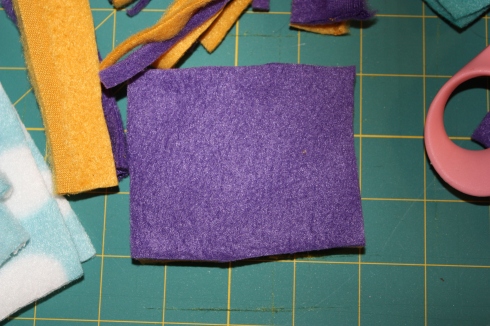
This is a quick way to dress up that host gift you bring along for the holidays (or any time of year).  It is also a great way to use of some scraps of fabric you have lying around.  You’ll need one piece of fabric 20 x 12 inches.  I’ve found cotton works well and there are so many options to get you into the festive holiday spirit.  No fabric lying about? Visit the salvage bins at your craft stores.  You can typically find fabric here for 50 to 75% off.  You’ll also need a piece of ribbon 30 inches long.  I keep some spools of the narrow $1.00 ribbon lying about for projects like this one.

Fold the piece of fabric in half the long direction- right sides facing in towards each other. Fold the piece of ribbon in half. Measure 13 inches from one end along the two edged side.  At the thirteen inch mark, pin the ribbon inside the fabric so that all but the fold of theribbon istucked inside between the two pieces of fabric.

IMG_1145

Pin the two pieces together along the edge where the two sides of fabric meet.  Sew along this edge making sure that you only sew across the ribbon at the 13 inch mark where the ribbon is folded. When you have completed this side seam, fold the fabric on the end closest to the ribbon down four inches. Sew along the seam once more where the fabric is doubled over.

IMG_1153

Now open the sleeve and refold the fabric so that it is inside out one portion of the sleeve and right side side out for the four inches you resewed.  You should be able to see two ribbons loose within the sleeve as well.

IMG_1148

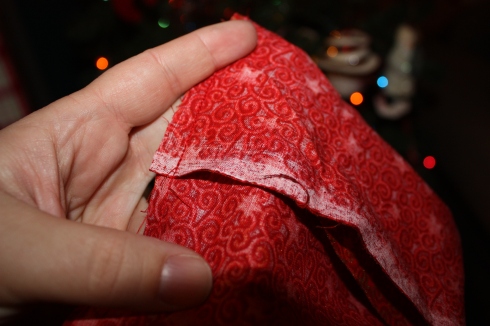
Turn the sleeve  and refold it so that the seam faces you and  runs right down the middle.  On the opposite end of the sleeve that the ribbon is closest to,  fold in the fabric to the center approximately one inch on each side and pin.

IMG_1150

Sew across the folds (being careful to not stitch across the ribbons inside)

IMG_1152

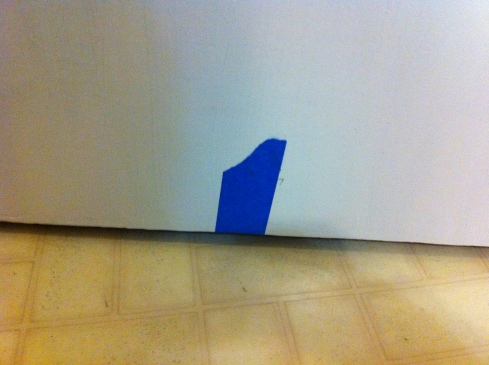
Now invert the sleeve and the bottom of your wine gift bag should like this below.

IMG_1158

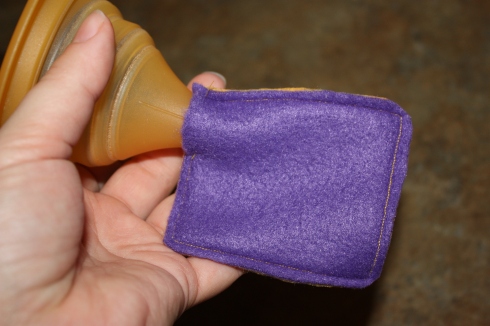
Simply add your favorite bottle of wine, champagne or liter of beer and you have a lovely hostess gift!

IMG_1156

As you can see we are ready for Christmas at this house!

Merry Christmas to those who celebrate and Happy Solstice and Happy Hanukkah to others of you in this holiday season.

A Knitter’s Ornament

18 Dec

After spotting a cute ornament on Pinterest that looked like a ball of yarn with knitting needles, I knew I had to make my own version for friends in my knitting group for the holidays this year (and for my own tree, of course!).  Plus, this was another great way to use up some of my yarn stash.

To create the ornament, I used the following:

  • Scrap yarn
  • cheap ornament
  • wooden skewers
  • wooden beads
  • wood glue

IMG_1383

For the ball of yarn, I wrapped the ornament with yarn until it was completely covered.  When covered, I used my yarn needle to weave in the yarn end.  I recommend using an ornament that has some texture on it, otherwise the yarn just slips off the ornament when you start trying to wrap it.

IMG_1385

To create the mini knitting needles, I used wooden skewers and wooden beads.  I simply snapped the skewers with my hands to break them down to size, and then trimmed the end with a scissors.  I rolled the cut end of the skewer into the wood glue and then glued on the wood bead.

IMG_1384

Here’s the finished ornament:IMG_1388

This could be that perfect gift for any knitter in your life!

Personalized Holiday Gift Basket

13 Dec

Each year I try to come up with some quick gifts to share with neighbors and family alike.  Today’s post has a few elements to it, but all were completed in less than an hour and within that hour you could have completed ten or twenty as easily as one!

I found metal baskets in the Dollar Section at Target in green, red and brown. They were originally $2.50 each, but were 50% off at Thanksgiving.  I bought twenty to use for holiday gifts and upcoming weddings.  My intent was to put a monogram on the front of the metal basket to personalize each one for the family or individual to whom I was giving them.

I tried a variety of colors with the red, settling on a vibrant green.

IMG_1125

I then used my cricut to cut out the letters.  While I’m not papercrafting and scrapbooking as much as I used to I am finding vinyl a new life for this crafting machine in cutting out vinyl.

IMG_1131

I had anticipated using a 2 1/2 inch letter on the front, but when I printed it wasn’t proportioned quite right.  I increased the size on the cricket to 4 and cut again to have my desired size of the letter “R”.   As you can see- while it was noted at a size 4 on the cricut, the actual size was closer to the 2 1/2 inches I was looking for.  I used the Jasmine font for this letter.

IMG_1127

They vinyl is self stick so I was able to just eye-ball the center vertically and horizontally and stick it to the basket.  Now to fill the basket!  Every year after the holiday season I haunt the aisles of Target watching and waiting for the prices to drop from 50% to 75% to 90%.  If there are things I love I pick them up at 50%. For things I need, but don’t necessarily love like small gifts I wait until holiday items drop to 75% then I stock up on holiday hand towels, and soap and other trinkets that could be great stocking stuffers or paired with a homemade treat.  I wait for 90% off to pick up fun decorative items like tissue paper, wrapping paper, paper bags and small ornaments that I can decorate packages with like the snowflake below.

IMG_1132

I found this package of two ornaments for probably twenty cents when the holiday clearance hit 90% off.  The plastic bag is one that was gifted to me that I was able to reuse. Inside the bag is tucked a ziplock bag of puppy chow– one of my favorite snacks from this time of the year and a simple and easy holiday treat that doesn’t require baking.  Behind the bag of puppy chow are two holiday hand towels purchased on clearance last year and a toy also purchased in the Target clearance aisle.

IMG_1134

Hopefully the basket can be used for cards and other things for years to come!  I hope the neighbors like it!

Holiday Card Display

11 Dec

Are all those holiday cards piling up on your kitchen counter looking for the perfect place to be displayed?  I’ve created a very easy and inexpensive card display that has been a great addition to our holiday decor.

All you need is:

  • Ribbon, string, or yarn
  • Clothes pins, paper clips, or binder clips
  • Painters tape, poster putty, or command hooks

IMG_1366

I display our cards on an interior door that’s located in the middle of all the action in our house. It’s the door to the stairway leading to our second floor, and it’s located in an open area between our kitchen and living room.  I hang 2 or 3 lengths of ribbon down the front of the door, and then simply clip the cards to the ribbon with small decorative clothes pins as they come in the mail.  You could also easily use some simple string or yarn instead of ribbon.

In the past, I’ve just used painter’s tape on the back of the door to secure the ribbon.  But this year, I decided to try using removable command hooks on the top part of the  back side of the door.  I started by putting the command hooks upside down, and tying the ribbon to each hook.  The ribbon then wraps around the full front of the door, and I still used some trusty painters tape to secure the bottom.

IMG_1371

IMG_1372

That’s it, the 2 minute card display!

Back Camera

Do you have a fun and easy way to display your cards? Please share!

Holiday Hand-warmers

7 Dec

I’ve been on the lookout for some easy gifts for the holiday and ran across these handwarmers on pinterest. If you don’t sew and are looking to buy some handmade items I think they’d be a great little stocking stuffer to buy on Etsy.  il_570xN.361035171

Fortunately, I do sew and I thought I’d try my hand at making them myself.  I love that they are reusable  hand warmers without chemicals found in the store-bought version.  I also love that at work this week some volunteers and residents happened to make fleece tie blankets.  The corner pieces that were cut out were perfect for this project at 4″ by 4″ and were otherwise destined for the trash.

To begin, I cut my fabric down a bit to 3 1/4″ to 2 1/2″ rectangles.  I wanted to start with a simple rectangle for ease of sewing.  This first set will obviously be going to a Vikings fan!

IMG_1087

I set my sewing machine to a very short stitch to make sure that no rice filling could escape. I began my stitch a bit more than halfway down one side.  Be sure to back-stitch so the seam is held.  I sewed carefully around the entirety to the corner, again back-stitching to hold the seam.  This left a small space for my funnel.

IMG_1090

From there I poured in some plain white long grain rice.

IMG_1091

Fleece is a perfect fabric for this type of project.  It has a bit of stretch so even as the rice grains are filling up the body it is able to accommodate them.  To speed up the process of the rice going in I carefully used a metal skewer to work the rice in a bit faster.  If you don’t have one of these a toothpick would also likely work.

IMG_1094

Here you can see the hand-warmer is nearly full.  Again, use the stretch in the fleece to your advantage by moving the grains into the corners of the hand warmer.

IMG_1093

Now comes the tricky portion.  I did pin the opening, but found that working with the pins and the handwarmer itself became too much. IMG_1095

I pushed as much of the rice away from the sewing opening as possible to allow the foot of the machine as much room as possible to finish the last portion of the seam.  I found it easier to sew from the middle of the side to the corner.  In other words- in the example of the photo above I would sew directionally from the red pin towards the pink pin making sure to reverse stitch on both ends to lock your seams, although  I found you could remove the pins and for the most part the rice would stay put while you sewed your last seam.

IMG_1096

You now have two hand warmers fit for a Vikings fan!  Simply microwave for approximately 25 seconds and you are set for an afternoon of ice skating, ice fishing, cross-country or downhill skiing.

I think I’ll try my hand at the heart shape above on the next set.  It would also be fun to decorate these hand warmers with initials before stitching them together. There are so many possibilities.  My guess would be this project took me less than half an hour to complete and the cost was nearly nothing with left over fleece and rice from the cupboard.  If you don’t have fleece left-over be sure to check the remnants bin at your local Jo-Ann fabrics store.  Remnants are 50% off and on weeks like this one when fleece is already 50% off that means you could get remnants for 75% off!

IMG_1097

Perfectly palm-sized!

Yarn Wreath: Christmas Edition

4 Dec

Back in October, I created this yarn wreath with a removable autumn flower embellishment.  My intention was to be able to change it up for different seasons, so I decided to tackle a Christmas version.  Like the autumn version, I used felt to create flowers, but this time a poinsettia  flower.  I had some red scraps from the autumn project, and also picked up some additional red and green felt to complete the project.

To craft the poinsettias, I cut the felt into long strips of varying sizes, and  cut the strips down to rectangles.  I then trimmed one side of the rectangle to make a petal shape.

CYW 3

Using a needle and thread, I did a simple stitch across the bottom of 5 petals lined up in a row. 

CYW 1

To cinch the petals into a flower, I stitched back through the first petal and pulled the thread tight. 

CYW 2

This created a sweet five petal flower with some nice dimension.  To secure the flower, I stitched again through the center of the petals and then knotted the thread.

CYW 4

Like the autumn wreath, I cut a base section of felt  and started glueing the poinsettias into place.

CYW 5

I also cut some green leaves and glued them into place to accent the flowers.  

CYW 6

To attach the flower piece to the wreath, I used the same method I did for the autumn wreath – I fastened the piece into place by weaving a piece of yarn through the flowers and around the wreath in about four different places, and tied it in the back.  This made for a very easy way to remove the other piece.  You can see this in more detail here, along with how I created the yarn wreath.  Other options could be to add snaps or velcro.

Here is the completed Christmas wreath.

CYW 7