TV Tray turned Ironing Board

25 Apr

A long while ago I picked up a wooden black TV tray at the Salvation Army for $4.  I had been pondering a way to be able to sew and press seams easily without having a huge ironing board cluttering up my space.  This TV tray would become the answer.  For several years I used a pillowcase on top of the tv tray and it functioned fairly well as a small space to press seams. I could use this to press in front of the television or next to my sewing space (which I will show you one day when it doesn’t look like a tornado has been through the area!).  However, the pillowcase would often slip off so I was looking for a permanent solution. Finally I would make an ironing cover to work the way I wanted!  I started with some scrap batting and some fabric that I rescued from a bin of fabric my mom was donating to the quilt makers at her church.  I measured across the top of the tv tray and underneath on both sides. I did this both directions.  Take it from me and do this twice and remember to add in room for a seam allowance- about a half an inch on each side.

IMG_8942

I then sandwiched some leftover batting in between the two pieces of fabric. Pinned it all the way around and sewed a seam about 2 inches in on each side creating a box.  To make sure the the batting wouldn’t shift, I also sewed across the center.

IMG_8950I then folded in the edges to create a nice edge and sewed the edges around the perimeter, save a one inch opening. Through this I threaded a thin piece of ribbon connected to a safety pin.  This would form a drawstring to tighten the bottom of the cover. FAIL!  It was at this point I realized I had measured incorrectly.  The  fabric was too short lenghwise!  I also discovered that I needed to create a smaller space for the drawstring to be threaded through- it wasn’t cinching around the sides of the table- it was cinching on top.

IMG_8985So I ripped out the seams I made on the edge. I unfolded the amount I had sewn under. I then sewed along the rough edge around the perimeter save the one inch space.  I sewed a complete square inside this seam about a 1/2 inch to 3/4 inch wide.  This would become the new space through which I would run the ribbon as described above.  You can see the two seams in the photo above.

IMG_8990

I once again threaded the ribbon through the gap in the outer circle and through the small space I had left for it.  I set the cover on the table and cinched the ribbon tight.  It worked!  I tied a knot with the ribbon to keep the fabric stretched taut. Viola! A handy tool for next to your sewing machine or your sofa!


She’s here!
16 Apr

Quinn Marian arrived on April 9, 2013!

Here is a sneak peak at some newborn pictures featuring the sweater, hat and booties I featured in previous posts!IMG_0132IMG_0090IMG_0136

With those long fingers, she just might be a concert pianist…and most definitely a knitter. 😉  We are so very happy and blessed!

Thank you Mother Nature!

11 Apr

A few months ago in this post I promised I’d have Fred’s hat done before winter was over.  The Spring Solstice has come and gone, and the hat wasn’t finished. As I write this on April 10th, we’ve already received a blanket of new snow and 6 to 10 inches are expected tomorrow.  Winter drags on, but the hat is complete!

IMG_8968

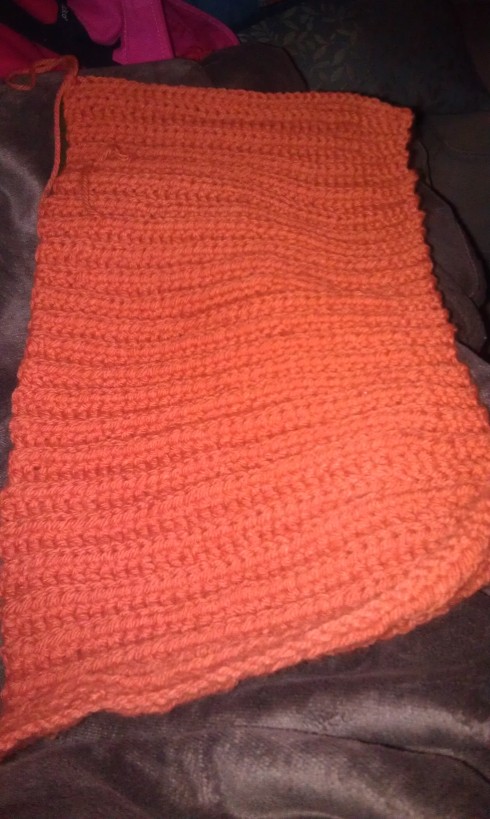
I used this pattern to create the hat.  Unlike most hats I have crocheted in the round, this was crocheted into one long rectangle.

orange hat rectangleI then joined the two sides with a hidden stitched.

IMG_8951After  creating the tube, you crocheted the top together to shape the beanie.

IMG_8963Aww the joys of   late night self photography? This was a relatively easy pattern using a half double crochet, single crochet, slip stitch and single crochet decrease, although you wouldn’t know it for how long it took me to complete this project!

IMG_8959And another view for you all. Too bad Fred wasn’t here to model for me!

Happy almost spring!

Hat and Booties

9 Apr

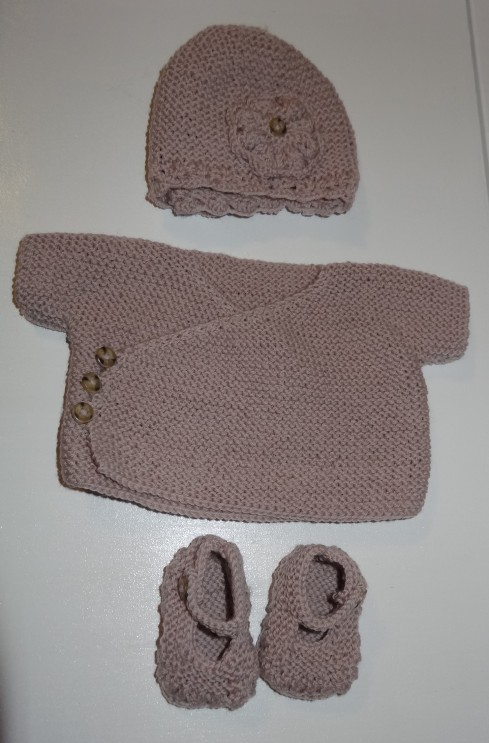
I finished knitting the hat and booties I had planned to go with the Wrap Sweater I posted about a few weeks ago.  Just in time with less than a week until my due date!

I found both patterns in Natural Nursery Knits by Erika Knight, the same designer of the wrap sweater, and knit them with Baby Ull yarn. Here is the finished result:

DSC00204

And a preview of the complete outfit:

DSC00207

I’m ready whenever you are, baby!

DIY Rosette Headband

2 Apr

Some of the items on my baby prep to-do list includes some cute accessories to have on hand for those early newborn pictures.  I decided I should try my hand at creating a cute little “I’m a girl” headband for her to wear.  While unpacking and putting away some baby gifts this weekend, there were a few things that caught my eye that I figured I could re-purpose into some rosettes for a headband.  I gathered them up along with some other items I had in my stash:  Cute ribbon from sweetly wrapped packages, some left over fabric from projects past, and the fabric pouch that a crib sheet was packaged in.

DSC00163

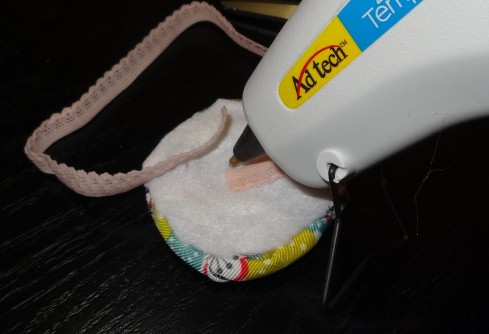
To make the rosettes, I cut the fabric into about 1 -2 inch wide strips.  Next I cut out a circle from some left over felt to use as a base to the flower. I took my glue gun and added a dab of glue in the middle of the felt circle, and adhered the corner of the fabric to the center.   I let it sit for about a minute for the glue to harden everything into place.

DSC00171

I then twisted the fabric, and started to wind it around the center, using my glue gun to glue the fabric down every inch or two as I wrapped it around and around.

DSC00174

Once complete, I trimmed away the felt base from the edges.

DSC00179

I created several different rosettes using this same method. You can see that the different materials created slightly different looks, and I also played around with how tight or loosely I twisted the fabric or ribbon.

DSC00190

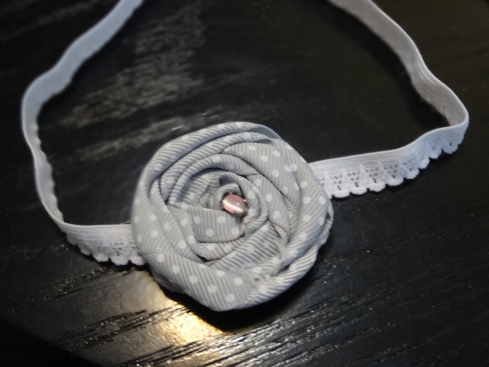
I also hunted through my jewelry box to see if there were any old earrings or accessories that I could use for embellishing a rose or two.  I came across the hair pins that I wore for my wedding, and thought it would be fun to incorporate one of them into one of the flowers.  The gem was attached to the hair pin with some wires, so I simply clipped and unwound the wire to remove the gem, and then glued it into one of the rosettes.

DSC00180

To create the headband, I picked up some elastic at JoAnn Fabric. They were a knit texture with a sort of lace pattern that was softer than the other elastics, so I thought it would be nice and soft for a baby’s head.

DSC00181

I had used a tutorial I found on Pinterest to create the headband at http://thesassypepper.blogspot.ca/2011/02/headband-tutorial-and-bitsy-band.html. It referenced this headband measurement guide:

Newborn (13 1/4″)
3-6 Months (14 1/2″)
6-12 Months (16″)
12 Months-Teen (17 1/2″)
Adult (18″)

So I measured out 13-1/4″ of the elastic for a newborn size band, and glued the ends into place on the back of one of the rosettes.

DSC00183

The tutorial recommended a 1/4″ overlap.

DSC00185

Once the band was in place, I cut another circle of felt to glue a final base on the back of the flower.

DSC00186

I made three different versions with the rosettes I made:

DSC00196

After I had finished them up, I came across an orphaned earring and did one more add to the grey polka dot headband.  Can’t wait to see how they look on our baby girl’s head!

DSC00198

Baby Shower Decor

28 Mar

Here in Minnesota we are all clamoring for Spring.  I decided to bring Spring indoors as the decor for Gina’s baby shower this past weekend.

My inspiration started from this photo I found on Pinterest a month or two ago.

I gathered up the tissue paper I had on hand and grabbed a few more multicolored packs at Dollar Tree.  I folded the piece of tissue paper in half the long way to double the thickness, then I accordion folded it the entire length of this paper. As you can see below I had some help.IMG_8916

You will also need the smaller sized “fans” which is what is pictured above.  To make these we cut the tissue paper in half the long way.  I then folded it again in half again to double the thickness the long way and accordion folded all the way down the paper.   When I had each piece folded I taped a piece of scotch tape around the end of the folds, creating a fan.

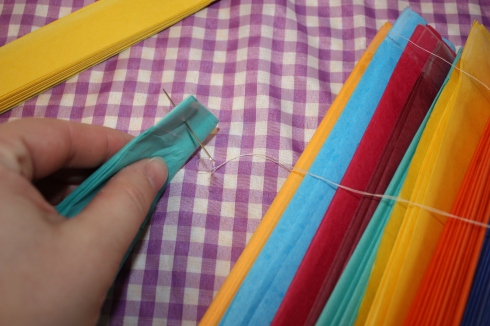
IMG_8914I then took a needle and some simple white thread and stitched through the center of the taped area on each of the larger fans.  I think fishing line could work well for this as well. While I only used one string I might recommend two strings be stitched through each fan a quarter to half inch apart.  This will allow for additional stability as you separate the fans and make it less likely for the fans to slide on their own.

Now to attach the smaller fans to the larger fans.  Double-sided tape would work well for this. I used small scrap booking squares that have adhesive on both sides. I placed a small square of double-sided adhesive on the top and bottom of each side of the small fan.  I then inverted the fan so that it “fanned” the opposite direction as the larger sized fan.  I fastened one between two large fans.

IMG_8918This is what the entire length of my banner looked like before it was hung in the room. As I stitched through each fan, I left the spool of thread going so I knew I would have plenty of thread for whatever length this ended up.

tissuepaperbanner2

Here it is hung and ready for the party!  We fastened it to the walls with packing tape. It took three of us to get this up on the walls although two could have handled it had we prepped the tape before hand.  It is made with tissue paper so it is a bit delicate and takes some care to hang.  The good news is when the party was done I carefully removed the banner and folded it back up to be packed away for another party in the future. You can hardly tell it was even used!

IMG_8923

Along with the bright banner I added some table cloths made from clearance gingham fabric I bought a few years ago in preparation for another baby shower.  I’ve used them for three or four other showers along the way and they still look bright and welcoming- especially on this cold winter spring day!

IMG_8921At Trader Joes I picked up some bright spring blooms of tulips and daffodils to add a little life to the party for less than $10.  Silverware were rolled into new cloth napkins I had onhand (purchased for less than $1 a piece at my local Salvation Army that has Target samples) and tied with florist ribbon I picked up at a garage sale years ago.

IMG_8920

Also bringing a bit of spring fun to the tables were the party favors.  I found these fun patterned gardening gloves at our local Dollar Tree for $1 each and paired them with a packet of seeds that were 4 for a $1 also at the Dollar Tree.

IMG_8919

Last summer I bought a pack of 20+ of these favor boxes for $1 at a garage sale knowing they would make a great favor for a party.  They were originally intended for a wedding favor with a wax seal and white ribbon, but I knew they could be re-purposed into something much more fun with a little bit of color.  I think when paired together these inexpensive favors (approximately $1.35 each) looked much more expensive and polished and were a great take-away for the guests who came to celebrate Gina and the new life she is growing!

Yarn Wreath: Spring Edition

26 Mar

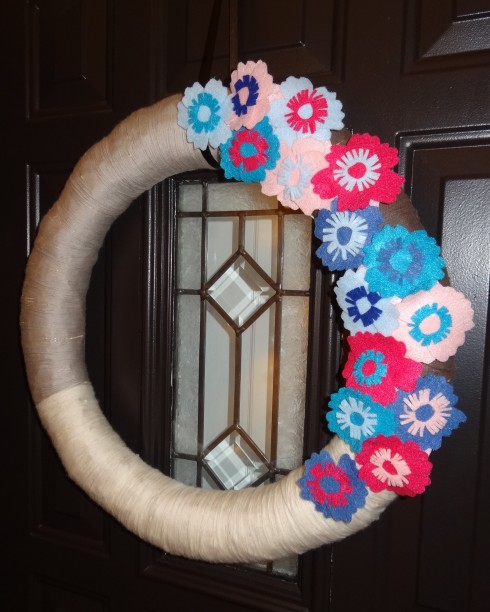
I got my Seasonal Yarn Wreath updated just in time for Easter.  I found a new version of felt flowers to make, via The Purl Bee’s Anemone Magnet tutorial.  I thought these were cute and colorful flowers to give a friendly boot to the snow, and hello to the sunshine!

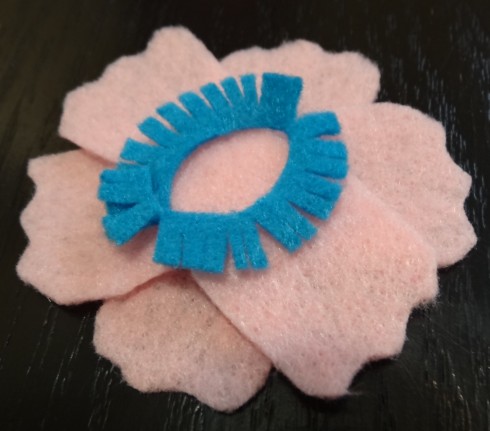
For each flower, I cut (free hand) three 1″x2″ strips of felt for the petals, and a thin 2″ strip to make the center of the flower.

DSC00117

I then shaped each petal.

DSC00120

And snipped the thin strip into fringe.

DSC00122

I used fabric glue to glue the pieces together.

DSC00124

DSC00123

DSC00127

And then used a glue gun to adhere each flower to a felt base for the wreath.

DSC00137

As you’ve seen me do in my previous wreath posts, I trimmed the felt base behind the flowers, and used extra yarn to tie the piece into place.  Here is how my door now greets you!

DSC00159

Kubb Messenger Bag

22 Mar

Remember this post last fall about the Kubb set?  Not long after, I set about making a bag for the Kubb set.  I sewed, I took pictures, and then I needed Velcro. This project has been sitting in my sewing room waiting for Velcro  for months, but I finished this in five minutes the other morning.

IMG_0044

To figure out the sizing of the bag I did a little measuring of my Kubb pieces to figure out how big I wanted the bag to be.  This might look like scribbling to you, but it helped me cut my pieces.

  • One piece 22″ by 10″ for the bottom
  • Two pieces 10″ by 16″ for the sides
  • One pieces 22″ by 16″ for the front
  • One piece 22″ by 29″ for the back, and flap
  • One piece 4″ by 40″ for the handle

IMG_0047While wondering around the suburbs of Eagan my friend Johnna and I stumbled up on a garage sale with yards and yards of  upholstery for sale- many of it in smaller pieces in bags for $1 and other larger pieces for $1 or $2 per yard.   Most of these came from those big bags for $1!  First I laid out the pieces to know how they would go together with right sides facing in. I began by pinning them, then sewing together the back, bottom and front pieces. To reinforce the seams I sewed a tight zig-zag stitch.

IMG_0049

I then carefully pinned the sides into the front, bottom, and back piece as seen above.

IMG_0050This is what the corners looked like when it was sewn together.

IMG_0051

This is what it looked like right side out.  I had nice square corners that the Kubb pieces would fit into nicely.

IMG_0053This is the bag sewn together before I turned the edges over.  Because this will be used for yard games I wasn’t too worried about having the most perfect edges. I turned them over once along all the edges not yet hemmed- if you wanted a cleaner edge you could line this bag or double turn the edges so the rough edge was no longer visible.

IMG_0055Now to create the shoulder strap.  I opted for one long strap that could go over the shoulder or across the body. Taking the long piece of fabric, I folded it in half lengthwise with the right side facing in.  I then pinned the long two edges together and stitched them together with a straight seam. To flip the fabric rights side out, I used a scissor as seen above to push the fabric back through onto itself.

IMG_0056When this was complete I turned in the fabric on the other end of fabric that was left opened and stitched across the end.

IMG_8908 I tacked both ends on the inside of the bag and reinforced it by sewing across the end several times. If you look closely you can see this above.

IMG_8906For the last step I added a piece of velcro.  I first sewed the velcro onto the top flap, then filled the bag and measured to see where the second piece should appear. I pinned it in place, emptied the bag and sewed a small square to keep it in place.

IMG_8912

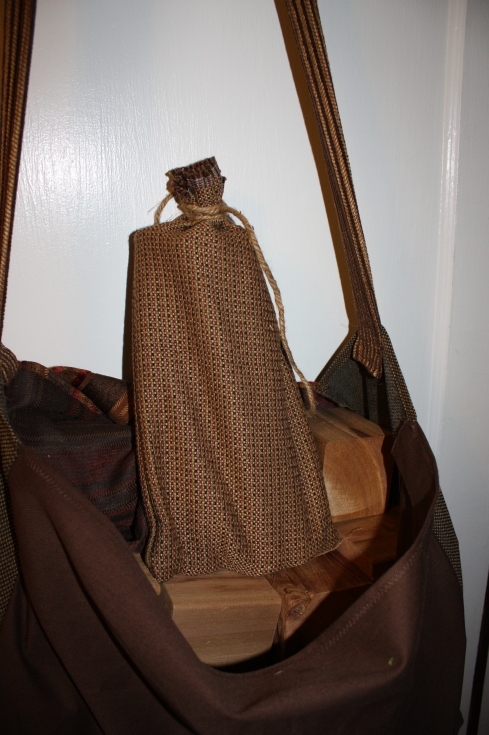
I had an extra piece of fabric I quickly sewed into a bag to hold the dowel throwing pieces. This way they wouldn’t easily fall out of the bag.

IMG_8905Here is a close up of the bag.

IMG_8913

Here is the full view of our new Kubb bag. I think it will transport easily to parks, camping excursions or in and out of the garage for a backyard game of Kubb. I plan on making a few more to fit the Kubb sets we have already gifted others!

Happy Friday everyone!

Tufting a Chair Cushion

20 Mar

I recovered my glider cushions a couple of weeks ago, and was considering tufting the back cushion with fabric buttons.  I decided to go ahead and try it.  I made a tufted headboard a few years ago, and have to admit there is something completely satisfying about making fabric buttons. I think it’s because they are so quick and easy to make, and the buttons look great!

To make the buttons, I use a button kit that you can find at any fabric or craft store.

DSC00095

I had plenty of extra fabric from the cushion recovering project.  The button kit has a plastic template to trace the appropriate sized circles onto the fabric. I traced and cut out 9 circles to create 9 buttons.

DSC00069

To create the buttons, you place the metal button onto the circle of fabric and push it into the white button mold with the blue “push” tool.

DSC00070DSC00071

DSC00072

You then fold the fabric into the inside of the button, and press in the button back with the blue push tool.

DSC00081

Here is what the buttons look like when complete.  It’s pretty much impossible to screw these up…I love them!

DSC00078

After I had the buttons made, I used a needle and thread to sew them into the cushion.  I first figured out the pattern and spacing on the cushion, and started sewing them in one at a time.  Because I wanted to keep my options open for the look of the cushion, I didn’t sew the buttons all the way through to the other side of the cushion fabric. I just sewed them through one of the two pieces of cushion I used to make the back cushion (see my original post for the cushion making details).  This allowed me to have one side tufted and one side smooth.

When I first tried pulling the thread through the cushion, the thread just cut right through, so I improvised and used a thin piece of cardboard from a cereal box in my recycling bin to give me a hard surface to hold the thread in place.  You can see that I started the stitch through the cardboard and cushion  and then pulled it back through the cushion and cardboard.

DSC00082

I pushed the needle back through to the top of the cushion, pulling the thread taut and knotted the thread before sewing through the button back and completing the button placement. This creates the tufted dimension for pulling the buttons into the cushion.

DSC00084

To finish, I knotted the thread on the back of the piece of cardboard.  This was repeated for each button until the cushion was complete:

DSC00156

Mittens in March?

14 Mar

Last year at this time the trees were in bloom and the temperatures were in the 70s and 80s over St. Patty’s Day.  This week we woke up to dustings of snow and frigid temperatures once again.  Perfect time to finish a new pair of mittens I’ve been meaning to make for months!

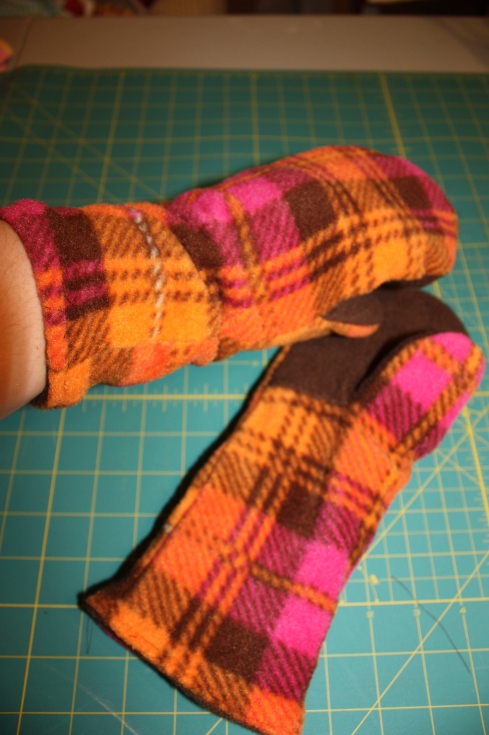
These mittens are made from a pattern used by a family friend- McCall’s M4683. Isn’t that pattern photo a riot? I’ve been blessed to have a few pairs made by her hand, but I thought they looked like a simple and easy gift- I was right.  Made with fleece they are easy to sew and super soft and cuddly warm.  They also go together quite quickly.  The pattern is doubled so that they have twice the coziness and wicked winter wind blocking factor. I cut these pieces out back in Thanksgiving while others watched a football game and I sewed them together in under a half hour one morning before work this week.  We added an extra two inches to the original pattern so the mittens went a bit further up the arm.

IMG_8890

Each mitten has six pieces at I laid out first to make sure I liked the looks with my coordinating fabrics.  These mittens are doubled, but if you wanted to leave them a little thinner you could make two pairs out of each group.

First you stitch the seam that goes around the thumb and across the palm-fleece should be facing each other right side in.

IMG_8891

This piece is then opened up and matched with the back side of the mitten.

IMG_8893I then pinned the pieces together and stitched all but the short flat end which will be the opening for the mitten.

IMG_8896Once all four of the mittens were sewn together I flipped one of the two pairs so that the fabric is right side out.  Then, one of the  mittens with the seams on the outside was then inserted into the mitten with the seems on the inside.  Before you insert the mitten be sure to trip extra fabric away. This will cut down on how big the seams feel on the inside of the mitten.   See above.

IMG_8898Using your hands make sure the thumbs are lined up correctly inside.  Then turn the rough edges into each other along the opening to the mitten and pin.  Sew along this edge for a nice finished seam as seen above.

IMG_8901

I love these mittens! I think they’ll make nice gifts for a silent auction I have coming up.  They are also affordable.  Check the remnant bin at JoAnn Fabrics for pieces of fleece-especially during fleece sales. Often times you will be able to purchase this material for 60 to 75% off .   My intent is to try this pattern with a few old sweaters I rescued from the trash and goodwill pile recently. I’ll post photos when I make that happen!